Homework 2: Continuous Integration to Automate Processes #
In this second homework, we are going to introduce you to the continuous integration and deployment platform called GitHub Actions, that is available for free on public repositories, and with a student pack, on private repositories as well.
GitHub Actions allows you to a lot of things, and we are only going to touch the surface. We are going to show you:
- the general way GitHub Actions workflows are run (Part I);
- how to use GitHub Actions to automate the deployment of a Hugo website (Part II);
- how to purchase and use a domain name (Part III);
- how to use GitHub Actions to create a web scraper that runs periodically, also called a git scraper (Part IV).
With this lessons, you will learn two invaluable skills: How to publish information automatically, and how to collect information automatically.
Important Note: You have the opportunity to earn extra credit by keeping a time log of your work. This log should include the time you spend on each part of the assignment, as well as any additional time you spend exploring and experimenting with Hugo. You can submit this log as a separate file in your repository, and it will be used to award extra credit based on the effort you put into the assignment.
Learning Objectives #
Learn how to use GitHub Actions for continuous integration and automation. This includes understanding YAML workflow configuration and using both predefined and custom actions.
Practice automating builds and deployment of a Hugo static site using GitHub Actions. Learn how CI/CD can simplify publishing updates.
Gain experience with configuring custom domains and DNS settings by purchasing and connecting a domain to GitHub Pages.
Understand principles of web crawling, web scraping, and “git scraping” using GitHub Actions. Explore ethical considerations in collecting web data.
Practice reading technical papers and documentation and summarizing key points. Develop skills in querying models like Claude for assistance.
Learn how to import repositories to safely experiment with changes to real-world projects. Practice configuring repository settings.
Gain experience providing documentation and software project metadata via high-quality READMEs, commit messages, etc.
Learn how to contribute feedback to improve software documentation using built-in GitHub features.
Develop familiarity with a variety of common tools like Hugo, NameCheap, GitHub Importer, etc. through hands-on use.
Practice communicating with AI assistants to explain technical concepts and summarize instructions. Improve query formulation skills.
General Note on Repositories #
Throughout this course, for every homework:
- You should create a public repository in your personal GitHub account.
- When a specific name is provided (such as
github-actions-quickstart), you should use that name for the repository. - You should ensure that a
README.mdis present and contains minimal information about your project (title, description, author, etc.). - You should ensure that the repository details are properly configured: The description, and if there is one, the homepage.
You should ensure that you have claimed the GitHub Student Developer Pack, which contains a number of benefits, including a free GitHub Pro account (which allows for private repositories) and GitHub Copilot.
Time Estimate, Deadlines and Milestones (6-14 hours) #
This assignment has never yet been done by students, so the time estimates are based on the author’s experience with the tools and technologies involved. The time estimates are based on the assumption that you are completely new on every topic, but if you have some familiarity you may be much faster.
- Part I: GitHub Actions Quickstart (1 hour)
- Part II: Automating the Deployment of a Hugo Website (1-3 hours)
- Part III: Purchasing and Using a Domain Name (1-2 hours)
- Part IV: Git Scraping (3-8 hours)
The suggested deadline for this homework is Friday Mar 15, 11:59 PM EST. If you cannot meet this deadline, you can request an extension.
Part I: GitHub Actions Quickstart (github-actions-quickstart)
#
The objective in this first part is to familiarize yourself with the concept of GitHub Actions, by reading the documentation,
Step 1: Create a Public Repository #
Create a public repository github-actions-quickstart in your GitHub account, and ask for a README.md file to be created as usual (to ensure that you can clone your repository).
⚠️ Note: Private repositories are not supported by GitHub Actions for free accounts. For this homework, this will not make a difference, because the repositories are public. However if you decide to use GitHub Actions in private repositories in the future, you will need to either upgrade to a student account or a paid account.
Step 2: Follow the GitHub Actions Quickstart #
In this step, you will create a .github/workflows/github-actions-demo.yml file in your repository github-actions-quickstart.
Read and follow step-by-step the guide
GitHub Actions Quickstart in your repository github-actions-quickstart.
Step 3: Ask Claude for Help with the GitHub Actions YAML File #
In this step, you will create a CLAUDE-GITHUB-ACTIONS-CONVERSATION.pdf file in the root directory of your github-actions-quickstart repository.
Once you have completed the quickstart once, you will have a .github/workflows/github-actions-demo.yml file in your repository. This file is a YAML file that describes a GitHub Actions workflow. It is a configuration file that tells GitHub Actions how to run your code.
You can learn about the GitHub Actions syntax many ways, but in this step, we will explore how to get assistance with a foundational model. Anthropic’s Claude is a high-quality, ethical and privacy-compliant conversation AI model that can help you understand the GitHub Actions YAML file.
- Go to Anthropic’s Claude. Select the Google account option to login, and use your Penn Google login to authenticate. The Free tier should be enough to complete this assignment in one session.
- Copy-paste the GitHub Actions YAML file from the
GitHub Actions Quickstart (pro-tip: rather than selecting and copying, you can use the copy-paste button which uses a glyph from the
Octicon library) into Claude, and ask it to explain it to you line-by-line.
{
Pro-Tip: Whenever you are writing a prompt that contains external material, it is a good idea to clearly separate your instructions from the external material, for instance:
Please explain the following GitHub Actions YAML file line-by-line: """ name: GitHub Actions Demo run-name: ${{ github.actor }} is testing out GitHub Actions 🚀 on: [push] jobs: Explore-GitHub-Actions: ... """ - Ask Claude follow-up questions in case you don’t understand something. As much as possible, attempt to ask questions such that you would be able to answer all questions about the quickstart given only this conversation as a ressource.
- Install the PrintFriendly browser extension on your browser: It works on Chrome, Firefox, Safari (the safari, and Edge.
- Use PrintFriendly to print the conversation with Claude to a PDF file, and include it in the root directory of your
github-actions-quickstartrepository asCLAUDE-GITHUB-ACTIONS-CONVERSATION.pdf.
Step 4: Submit Feedback on the Documentation #
In this step, you will create FEEDBACK-1.png, FEEDBACK-2.png files in the root directory of your github-actions-quickstart repository, as well as update your README.md.
The GitHub Actions Quickstart is a good example of the kind of documentation you will be reading extensively as a software engineer.
We have seen both the importance of having metrics for Quality Assurance (QA), but also how difficult it is to pick the right metrics. In the case of documentation, some metrics to measure quality, like the number of pages or the frequency of changes can be misleading or lead to adverse incentives. Instead, focusing on user ratings and feedback can provide more valuable insights.
In this step, you will experience the process of giving feedback. You can do so either by providing a positive/negative rating, along with feedback, or by making a direct contribution to the documentation. You can read more about this process in the corresponding blog article.
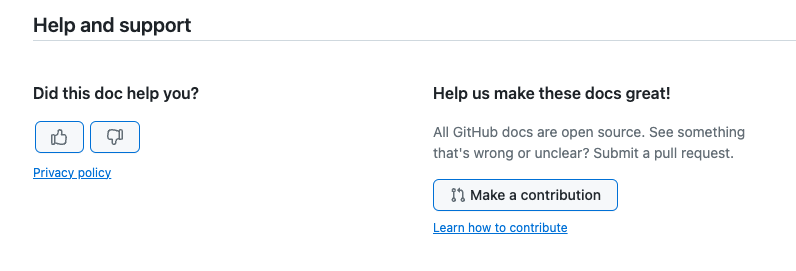
As a newcomer, which is the target audience of this quickstart guide, did you find the guide clear? informative? Did it provide sufficient context, or references, to help you understand what you are doing? Were you able to follow the steps without any issues?
If the documentation was clear, don’t hesitate to click thumbs up. If not, don’t hesitate to click thumbs down and provide feedback.
Here are some examples:
Add more details or an example explaining when
${{ github.actor }}and${{ github.event_name }}would be useful. As a new user, it’s unclear what these values represent.Include screenshots demonstrating where the workflow results can be viewed after being triggered. The text describes clicking on various links, but visuals would make this clearer.
Provide troubleshooting tips in case the example workflow fails or runs into errors. New users may run into issues setting up workflows.
Consider simplifying the example by removing 1-2 echo steps and focusing on the core checkout and list files steps. There is a lot of output for a new user to parse.
Add a section linking to other introductory workflows for common tasks like building, testing, deploying etc. so users have next steps.
Provide more details on the different GitHub Actions concepts like jobs, steps, and runners that are mentioned briefly. Beginners will likely need more background.
Explain how to view previous workflow run history and access logs/output of those past runs.
Concretely:
- Enter feedback, either thumbs up or down, and a text note, then take a screenshot called
FEEDBACK-1.pngand include it in the root directory of yourgithub-actions-quickstartrepository.- Also include the text note in the body of your
README.mdfile.
- Also include the text note in the body of your
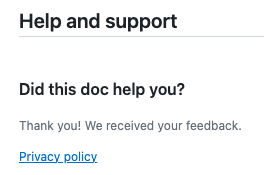
- Click to submit the feedback, then take a screenshot called
FEEDBACK-2.pngand include it like the previous one in your repository.
For example:
FEEDBACK-1.png

FEEDBACK-2.png
Part II: Automating the Deployment of a Hugo Website (hugo-mock-landing-page-autodeployed)
#
GitHub Actions allows us both to run arbitrary scripts, as illustrated in the quickstart, but also to use pre-built actions to automate common tasks. In this part, you will use GitHub Actions to automate the process of building and deploying the Hugo website you built in HW1.
These pre-built GitHub Actions cover a lot of scenarios. For example,
Shohei Ueda is an open source developer who uses GitHub Actions to support static websites. He has created a GitHub Action called
peaceiris/actions-gh-pages that automates the process of deploying the output of a static website generator to GitHub Pages.
Step 1: Import Your hugo-mock-landing-page Repository As hugo-mock-landing-page-autodeployed
#
Importing a repository creates a complete separate copy, with the identical version control history, that you can modify and experiment with, without affecting the original.
When modifying an existing repository, the best approach depends on your relationship to that project:
If it is your own repository or one you contribute to, typically you would create a new branch to isolate your changes from the main codebase. Branches let you easily merge your work after review or testing.
If it is an external project you don’t contribute to, you would commonly first fork the repository, then create branches within your fork copy to manage distinct features. Forking links your repository as a downstream copy of the original for easily submitting changes.
However, if you are early in the learning process or otherwise less confident working directly in shared repositories, importing a personal copy can be very useful. Importing creates a completely independent repository that decouples you from any upstream coordination. This frees you up to safely experiment, revise, break, and retry approaches as you ramp up your Git skills. Importing removes the stress of accidentally impacting other users’ code.
➡️ Read and follow the guide “
Importing a repository with GitHub Importer” to import your hugo-mock-landing-page repository as hugo-mock-landing-page-autodeployed.
Step 2: Adjust the baseURL in the config.toml File
#
In the hugo-mock-landing-page-autodeployed repository, you will need to adjust the baseURL in the config.toml file to reflect the new repository name.
baseURL = 'https://<GitHub username>.github.io/hugo-mock-landing-page-autodeployed/'
If the configuration file is in config.yaml format, the baseURL will be in the following format:
baseURL: 'https://<GitHub username>.github.io/hugo-mock-landing-page-autodeployed/'
Commit and push this change.
Step 3: Configure the Repository Settings #
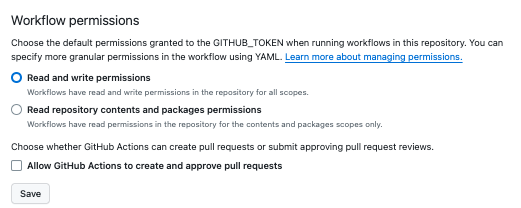
For complex security reasons, when a repository is created, the permissions are set to the most restrictive settings. This is a good thing, but it means that you will need to configure the repository settings to allow GitHub Actions to run.
➡️ You can follow the article “
Configuring the default GITHUB_TOKEN permissions” to configure the default GITHUB_TOKEN to have Read and write permissions.
➡️ Next, because we just created this repository, even if the source repository was published on GitHub Pages, we need to turn that setting back on. So
set the publishing source to gh-pages.
➡️ Finally walk through the “ Managing GitHub Actions permissions for your repository”, to set the permissions for GitHub Actions to: Allow all actions and reusable workflows.
Step 4: Add a GitHub Actions Workflow to Automate the Deployment #
➡️ Create a .github/workflows/gh-pages-deployment.yaml file in your hugo-mock-landing-page-autodeployed repository with the following content:
#######################################################
## Build and Deploy Hugo Website to GitHub Pages
## Author: Jérémie Lumbroso <lumbroso@seas.upenn.edu>
## Date: 2024-02-24
#######################################################

name: 🏗️ Build and Deploy GitHub Pages

on:
  push:
    branches:
      - main # Set a branch to deploy

jobs:
  deploy:
    runs-on: ubuntu-22.04
    steps:
      - name: 🔄 Check Out Source Repository
        uses: actions/checkout@v3.5.1
        with:
          submodules: true # Fetch Hugo themes (true OR recursive)
          fetch-depth: 0 # Fetch all history for .GitInfo and .Lastmod

      - name: 🛠️ Initialize Hugo Environment
        uses: peaceiris/actions-hugo@v2.6.0
        with:
          hugo-version: "0.123.4"
          extended: true

      - name: 🏗️ Compile Hugo Static Files
        run: hugo -D --gc --minify

      - name: 🚀 Publish to GitHub Pages
        uses: peaceiris/actions-gh-pages@v3.9.3
        with:
          github_token: ${{ secrets.GITHUB_TOKEN }}
          publish_branch: gh-pages
          user_name: "github-actions[bot]"
          user_email: "github-actions[bot]@users.noreply.github.com"
          ## NOTE: uncomment below if using a custom domain
          ## cname: mydomain.com
➡️ Commit and push the changes to your hugo-mock-landing-page-autodeployed repository.
Step 5: Ask Claude for Help with the GitHub Actions YAML File #
As in Step 3 of Part I, you will use Claude to understand the GitHub Actions YAML file you just created. Using PrintFriendly, add the transcript as github-actions-workflow-explanation.pdf in the root directory of your hugo-mock-landing-page-autodeployed repository. Please commit and push this file.
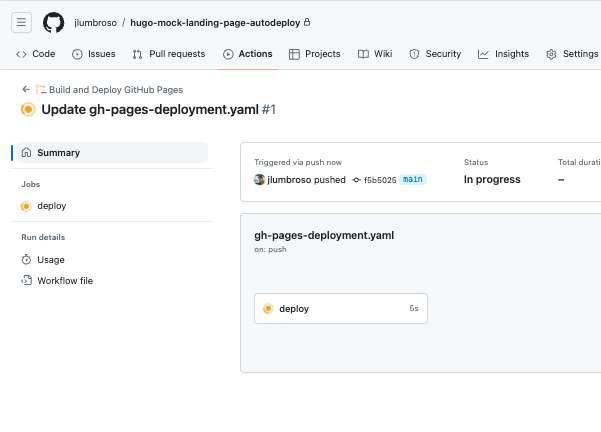
Step 6: Check the Deployment of the Website #
Having ensured that GitHub Actions is turned on in Step 3, you should now see the “Actions” tab in your repository. Having pushed the .github/workflows/gh-pages-deployment.yaml file in Step 4, you should see a new workflow running. (Sometimes the workflow is not launched on the first push, which is why we had you commit and push a file in the previous step, that would have also triggered a workflow of its own.)
Once the workflow is complete, you should be able to see the deployed website at https://<GitHub username>.github.io/hugo-mock-landing-page-autodeployed/.
- It can take a few minutes for the website to be deployed. If you see a 404 error, wait a few minutes and try again.
- If the workflow fails, one of the most likely answers is that Read and write permissions was not selected. Please review Step 2 carefully.
- You can always rerun jobs.
Step 7: Make a Change to the Website and Check the Deployment #
Make a change to the website and commit and push the change. This should trigger the GitHub Actions workflow again, and you should see the change reflected on the website.
For example, you could update the file content/contact.md. Since the website is no longer that of the original theme, users might want a convenient way to open an issue on the Github repository. Try changing the link to the theme repository to the following (be sure to replace jlumbroso with your Github username):
[Open an issue](https://github.com/jlumbroso/hugo-mock-landing-page-autodeployed/issues/new) on GitHub.
Once you have made this change, commit and push, and double-check that the website is updated. You may need to force refresh the browser.
Step 8: Document What You Think Is Useful #
Update the README.md file in your hugo-mock-landing-page-autodeployed repository to include a description of the workflow you just created. You can include parts of the transcript of the conversation with Claude (and include ask Claude or ChatGPT for help), and any other information you think is useful.
Part III: Purchasing and Using a Domain Name (hugo-mock-landing-page-domain-name)
#
In this part, you are going to spend a few dollars to buy a domain name, and then configure it to point to your GitHub Pages website. We are going to use NameCheap, which is a popular domain registrar, ranked #1 in 2024 by USNews.
As previously, so that you keep the different versions of the website, we are going to import the repository and create a separate website. (Typically, you would just continue making updates to the same codebase.)
Step 1: Import Your hugo-mock-landing-page-autodeployed Repository As hugo-mock-landing-page-domain-name And Configure It
#
Walkthrough Step 1 through Step 3 of Part II, but this time, import your hugo-mock-landing-page-autodeployed repository as hugo-mock-landing-page-domain-name. Make sure to adjust the baseURL in the config.toml file to reflect the new repository name, and configure the repository settings to allow GitHub Actions to run.
Step 2: Buy a Domain Name on NameCheap #
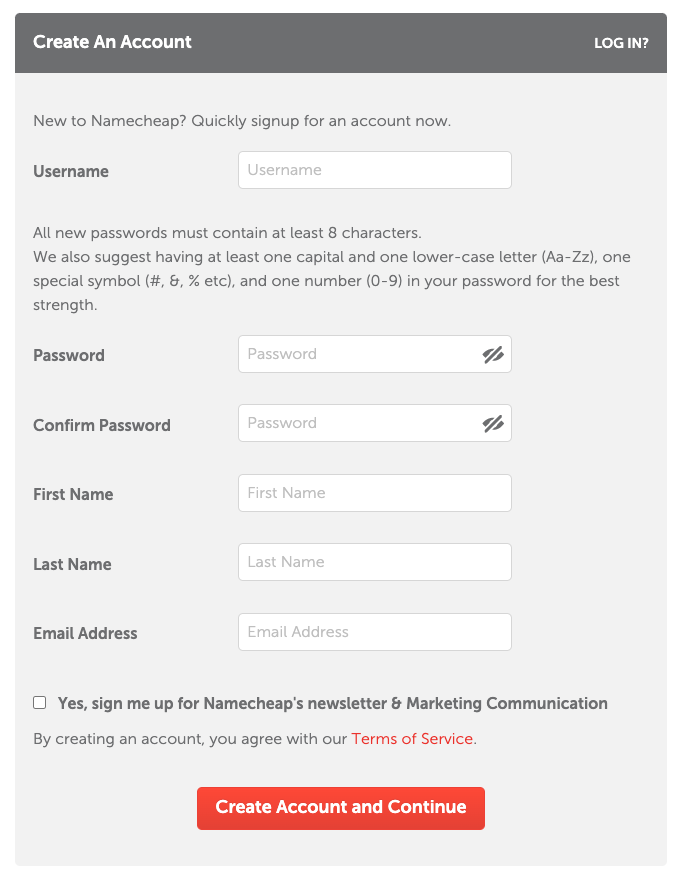
Register an account on NameCheap
Go to the Beast Mode domain search page. It is called this way because it searches across a large number of possible domain names. Enter a domain name you would like to purchase, click “Select All”, and click “Search”.
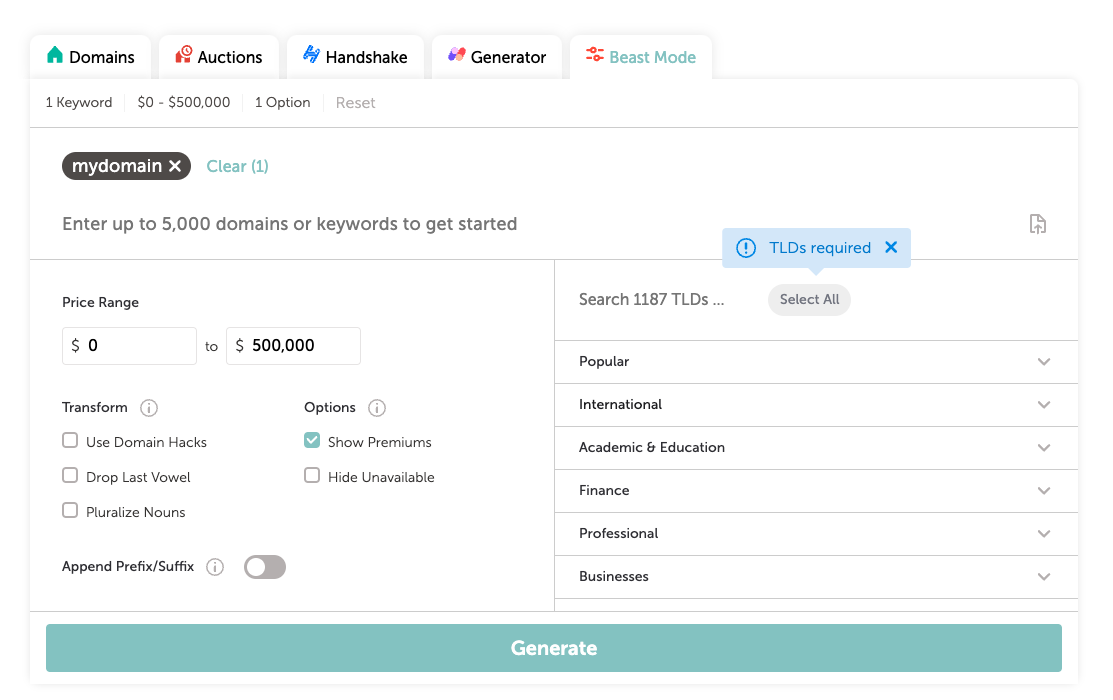
Select the domain name you would like to purchase, and click “Add to Cart”. You can read more about how to buy a domain on NameCheap. At the time of purchase,
mydomain.boatswas $1.80, and there are many similarly priced domains.Make sure to select Domain Privacy Protection. This is a service that hides your personal information from the public WHOIS database, which is a requirement of ICANN. It is a good idea to keep your personal information private. It is also a good idea to keep the Auto-Renew option on, so that you don’t lose your domain name.

Step 3: Configure the Domain Name to Point to Your GitHub Pages Website #
GitHub has an entire guide called “ Configuring a custom domain for your GitHub Pages site” that you can read to get better understanding.
We will try to summarize the instructions.
Configure the DNS settings of your domain on NameCheap as in the screenshot (pay attention both to the type of record, such as A or CNAME, and the value of the record, such as the IP address or the domain name; also be careful not to forget the period
.at the end of the domain, it is important):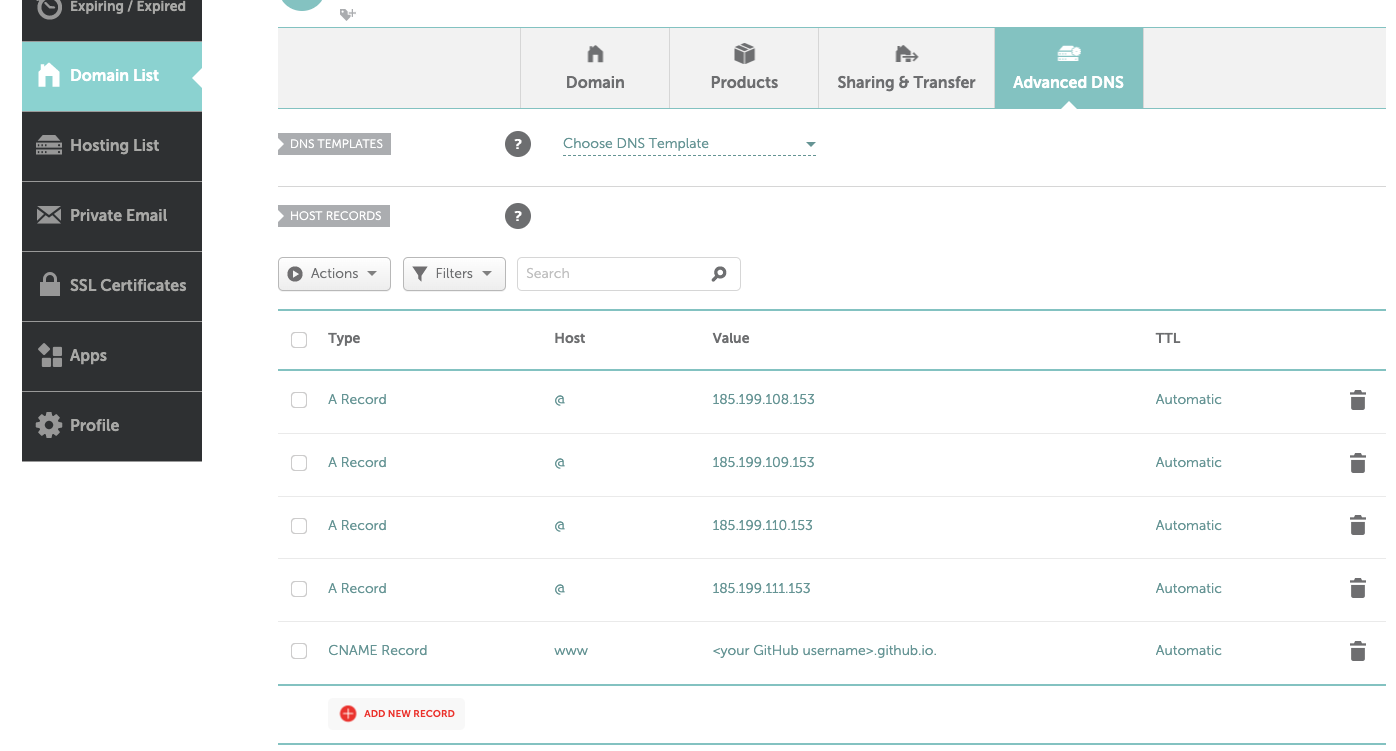
These details are available in the section “ DNS records for your custom domain”.
Next, edit the file
.github/workflows/gh-pages-deployment.yamlin yourhugo-mock-landing-page-domain-namerepository to include thecnamefield, as in the following example:## NOTE: uncomment below if using a custom domain ## cname: mydomain.comto:
          ## NOTE: uncomment below if using a custom domain
          cname: mydomain.boats
Next configure your GitHub Pages deployment settings to have the domain, if this isn’t already done by the continuous integration, by following “ Configuring a subdomain”.
Part IV: Git Scraping (daily-pennsylvanian-headline-scraper)
#
In this part, we are going to use GitHub Actions to create a web scraper to keep track of the front page headline of the Daily Pennsylvanian every day. Typically this would be a preparatory step before doing some sort of Natural Language Processing (NLP) analysis on the headlines, but for now we are just going to store the headlines in a file.
Some Background on Web Crawling and Web Scraping (daily-pennsylvanian-headline-scraper)
#
Web crawling is the process of creating a snapshot of a portion of the visitable web: It consists of systematically browsing the World Wide Web, and recording a copy of every page visited. This is a very important concept in the context of search engines, which use web crawlers to index the web; in addition, through the Common Crawl, a non-profit organization that crawls the web and freely provides its archives and datasets to the public, web crawling is also used in research, data analysis, and to power foundation models such as ChatGPT.

Web scraping is one of the most important concepts in our modern information ecosystem: Web scraping is the process of extracting structured data from websites. This can be done manually, but it is often done using a program that simulates human web browsing, and extracts the data. Web scraping is used in a variety of contexts, including data analysis, data journalism, and more.
Finally, Git scraping is a term coined by Simon Willison to describe a technique for writing scrapers that are run periodically through GitHub Actions, and commit the data to a Git repository. This has the advantage of providing a historical record of the data, and also of making the data available to others.
Step 1: Familiarize Yourself With The Ethicality and Legality of Scraping #
Read this recent scientific article (you may use Claude to help you summarize the key points, but I recommend you then look to read parts of the text for yourself if you do that). Additionally, read this recent legal judgement on web scraping, in which the Ninth Circuit upheld the right to scrape publicly available data.
In our case, we are going to scrape the front page of the Daily Pennsylvanian, which is a student-run newspaper at the University of Pennsylvania. The front page of the Daily Pennsylvanian is publicly available, and we are going to scrape only the headlines, which are also publicly available.
In addition, we our going to limit our scraping to once per day, and we are also going to respect the robots.txt file of the Daily Pennsylvanian website, which is a file that websites use to communicate to web crawlers which parts of the website they are allowed to scrape.
In doing so, we will be respecting the ethical and legal guidelines for web scraping.
Step 2: Create a New Repository daily-pennsylvanian-headline-scraper
#
Go to the
basic-git-scraper-template template repository, and
click “Use this template” to create a new repository daily-pennsylvanian-headline-scraper in your GitHub account.
Once you have created your own repository, the “Actions” tab should be available, and when you click on it, you should be able to see an initial workflow in place:
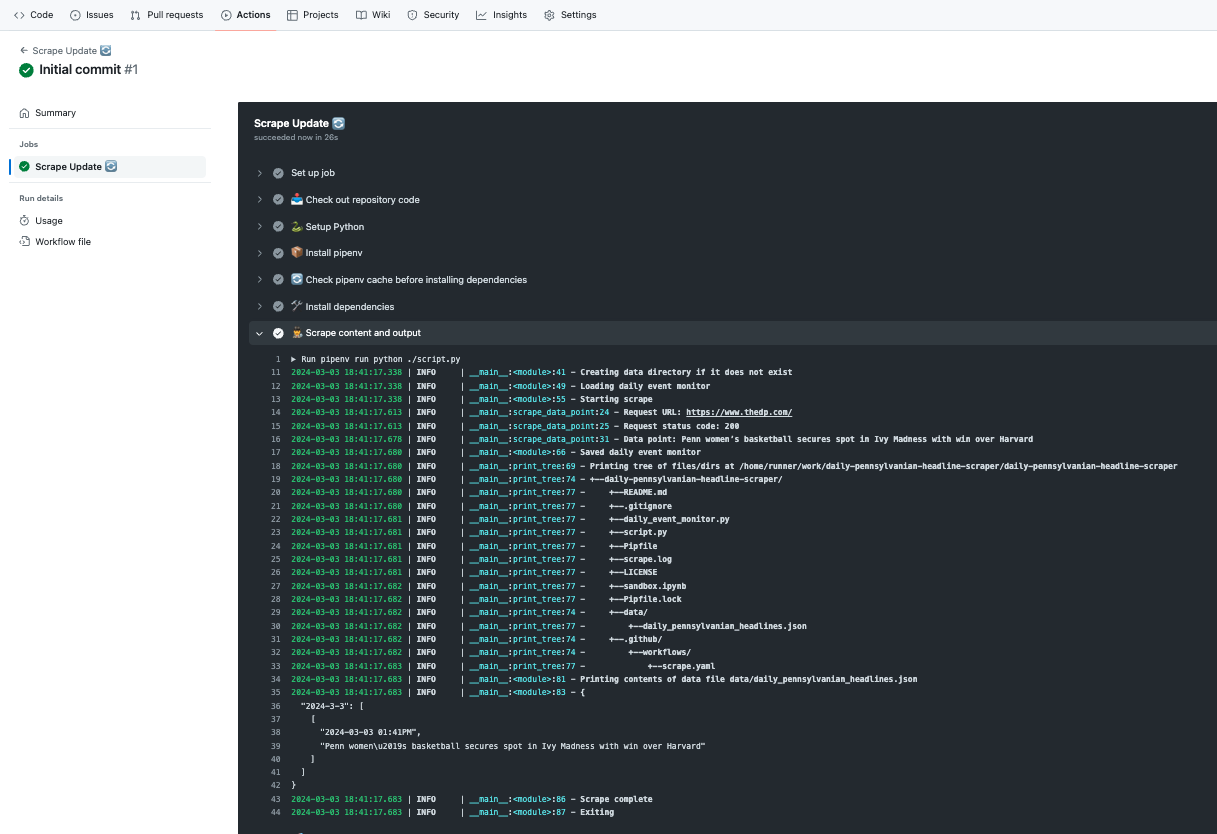
If you click on the workflow, you should be able to see the logs of the workflow, and you expand any step such as the “Scrape content and output” (or similar) step:
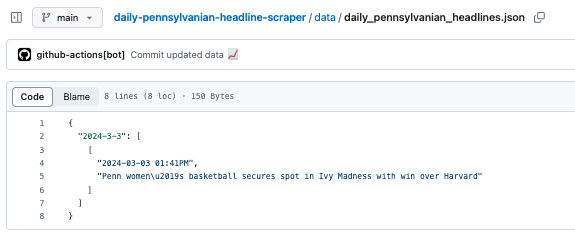
Once the initial workflow has run, if everything has worked correctly, you should be able to see the data file in the repository:
And if you click on the data file, you should be able to see the data:


Step 3: Understand How the Current Scraper Works #
The current scraping happens in the file script.py, in the function scrape_data_point:
def scrape_data_point():
    """
    Scrapes the main headline from The Daily Pennsylvanian home page.

    Returns:
        str: The headline text if found, otherwise an empty string.
    """
    req = requests.get("https://www.thedp.com")
    loguru.logger.info(f"Request URL: {req.url}")
    loguru.logger.info(f"Request status code: {req.status_code}")

    if req.ok:
        soup = bs4.BeautifulSoup(req.text, "html.parser")
        target_element = soup.find("a", class_="frontpage-link")
        data_point = "" if target_element is None else target_element.text
        loguru.logger.info(f"Data point: {data_point}")
        return data_point
This function uses:
- the
requestslibrary to make the request; - the
logurulibrary to log the status of the request and the data point; - the
beautifulsoup4library to parse the HTML and extract the data point.
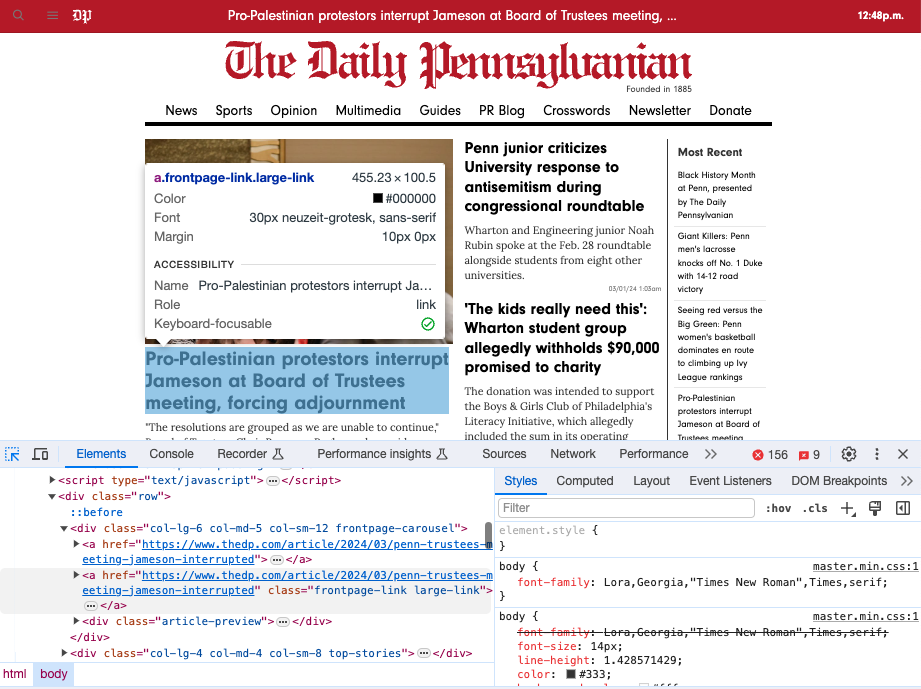
In the two lines here, it is looking for a link tag with "frontpage-link" as a class name, so <a href="..." class="frontpage-link">...</a>, and in the second step, if such an element has been found, it tries to extract the text inside the tag:
target_element = soup.find("a", class_="frontpage-link")
data_point = "" if target_element is None else target_element.text
The reason we are doing this is that when we went to the
Daily Pennsylvanian website, by using the “Inspect” feature of the browser, which can be accessed in Chrome by right-clicking on the page and selecting “Inspect”, we saw that the main headline was in a link tag with the class name "frontpage-link". This is a common way to structure a website, and it is a good way to structure a website, because it makes it easy to extract the data you want:
When the process runs over several days, it can collect data and let us know when and how the headline changes:
{
  "2024-3-3": [
    [
      "2024-03-03 01:41PM",
      "Penn women\u2019s basketball secures spot in Ivy Madness with win over Harvard"
    ]
  ],
  "2024-3-4": [
    [
      "2024-03-04 03:02PM",
      "Penn women\u2019s basketball secures spot in Ivy Madness with win over Harvard"
    ]
  ],
  "2024-3-5": [
    [
      "2024-03-05 03:02PM",
      "Penn women\u2019s basketball secures spot in Ivy Madness with win over Harvard"
    ]
  ],
  "2024-3-6": [
    [
      "2024-03-06 03:02PM",
      "Penn men's squash wins first national championship with victory at Potter Cup"
    ]
  ],
  "2024-3-7": [
    [
      "2024-03-07 03:02PM",
      "Penn extends test-optional policy for Class of 2029 while some Ivies reinstate testing requirement"
    ]
  ]
}
So for instance, scraping headlines could be useful in the context of a project seeking to analyze: What proportion of the Daily Pennsylvanian headlines are about sports versus academics? or How often does the headline change?
➡️ Before continuing onto the next steps, make sure you understand how the current scraper works. If you would like, you can use Claude or ChatGPT to explain the code to you, and you can include the transcript in a file called INITIAL-SCRAPER-EXPLANATION.pdf in the root directory of your daily-pennsylvanian-headline-scraper repository.
Step 4: Modify the Scraper’s Rule and Explain What You Did #
The current scraper is scraping the main headline from the Daily Pennsylvanian home page. However, the main headline is not always the most interesting headline.
Here are some examples you might consider, but it’s much better if the idea comes from you, this is just to get your inspiration going:
Scrape the top headline from the “Featured”, “News”, “Sports”, “Opinion” section on the homepage. Look for a specific CSS class or HTML structure unique to that section.
Scrape the top headline from the “News”, “Sports”, “Opinion” pages, which provide a full list of articles. Look for a specific CSS class or HTML structure unique to that section.
Navigate to the “Multimedia” page ( https://www.thedp.com/multimedia) and scrape the headline of the latest video or photo story.
Scrape the #1 most read article from the “Most Read” list at the bottom of the homepage. You’ll need to find the CSS selector or HTML element that identifies the top most read story.
Navigate to the “Podcasts” page ( https://www.thedp.com/section/podcasts) and scrape the title of the most recent podcast episode.
Scrape the featured headline from one of the other DP publications, such as “34th Street Magazine” or “Under the Button”, which are linked on the homepage.
Remember to carefully inspect the HTML structure of the target elements on The Daily Pennsylvanian website and adjust the scraper’s rule accordingly. You may need to update the CSS selectors or navigation logic in the scrape_data_point() function to accommodate the new scraping requirements.
After modifying the scraper, provide a clear explanation of the changes you made and the reasoning behind your chosen approach in your README.md. This will demonstrate your understanding of the scraping process and your ability to adapt the scraper to different use cases.
Some of the possibilities may require making multiple requests. For instance, if you would like to scrape information about the Daily Crosswords, it is necessary to:
- First, make a request to the Crosswords page to get the URL of the latest crossword.
- Then, make a request to the URL of the latest crossword to get the title of the crossword.
This would be a very interesting project, but it is one step more complex than the simple examples mentioned above.